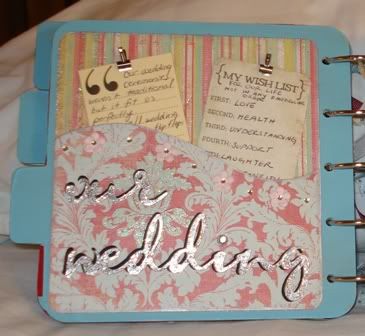
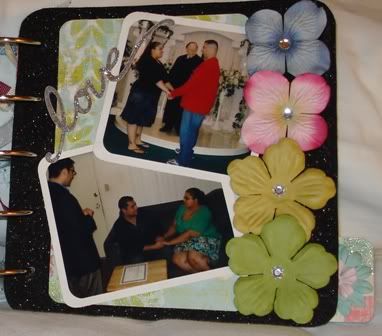
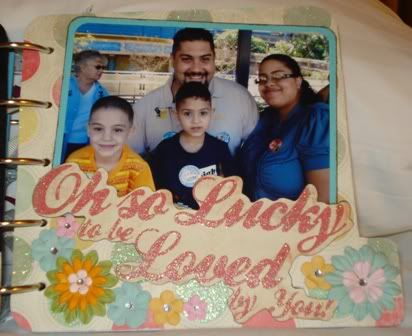
Subscribe Twitter Facebook

Sunday, February 28, 2010


Prima has something really big coming your way….
I love scrapbook suprises and goodies. And who doesn't just drool over prima flowers??? You can never have enough! I can't wait to see whats in store. There new stuff is amazing. I can't wait to use the Prima Cherry Blossoms I just bought with my Pagoda Cartridge and Asian Bundle Embossing Folders. I will post once I create it.
The best way to carry all your cricut cartridges

Before I owned my gypsy i used to carry all of my cartridges to every crop I went to. I am not much of a planner so I take everything with me. Below is the best way i found to carry all my cricut items. I also altered it with vinyl, ribbon, flowers and rhinestones. I bought this at Target. I did put all my cartridges in a zip lock bag with a list of what I owned. But I had all the books, layovers and even my jukebox in there.

Snapware 2-Layer Craft Organizer - Clear


Here is my nested images using the cricut tip featured on creativexpress.com
By Janee Fakhreddine
I love nested images. And I found a great way to do it using my cricut.

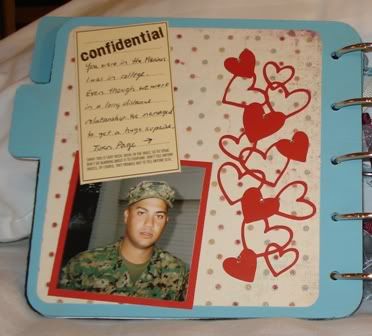
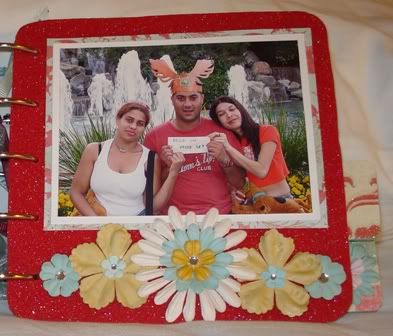
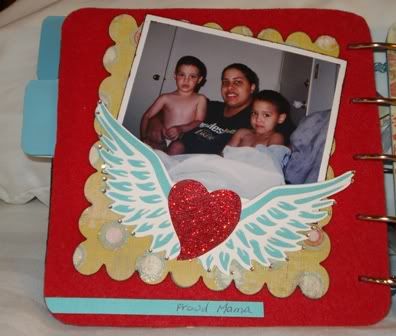
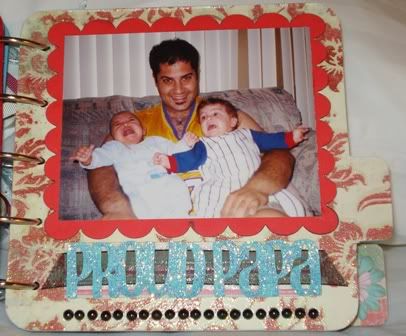
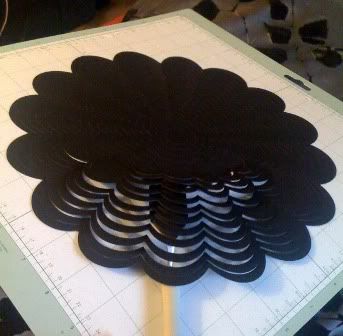
First you need to choose an image that is proportionate on each side. Load a 12x12 piece of paper. Press the center point button and line the cricut blade with the center of your paper. Select your image and cut the larges one you can first. Once that is done decrease your size by .5 and cut image again. Keep repeating step in .5 increments. Once you are done you will have a bunch of different sized images. This is also a great way to save paper if you know you want alot of that image on the same page.

Saturday, February 27, 2010

Here are just a few products and companies I can't live without!

Cuttlebug
I am in love with the embossing folders!


Gypsy
I love this machine. i am always learning on it and it really comes in handy when I travel for work and I'm bored in a hotel room.


Cricut Expression
I use this is almost everything I do. It really takes your crafts to the next level and so worth every penny!


GlueGlider Pro
I have carpal tunnel and this is the only adhesive that lets me crop 14 hours straight without it flaring up.


Scotch® Scrapbookers Glue with 2-way Applicator I use this for all my cricut needs!


Paper I Love!

I love Kaisercraft Kaiser my fave international company.

GCD Studios-Amazing Stuff!


Bazzill Cardstock
You could never have to much cardstock!


Basic Grey i love what you can create with their paper.

American Craft I love the AC Cardstock and Thickers

Busted!!! By Janee Fakhreddine
Here is a layout I did about 3 years ago. My kids got a hold of a sharpie... Yes and wrote all over everything!

Friday, February 26, 2010

Here is my CreativeXpress mini book using the Love Struck Cartridge.


Product


Hardware:


Prep Work:


  • Paint all pages of the Kaiser Craft Album with Making Memories Daiquiri Paint.

  • Trace an album page minus the tab on a piece of paper to use as a template. Using the template cut 3 pieces of stiff felt for added pages to the album. Insert felt pages in between painted wood Kaiser Craft Album and punch out holes.


  • Our Story - Cover


Cover:


  • Cover the front of your album with My Mind’s Eye – Laundry Line Coastal “Authentic” Real Imprint Paper

  • Using black cardstock cut 4” Heart <Heart1> from the Love Struck Cartridge & apply to album.

  • Cut title using 1 ¼” Ashlyn’s Alphabet in white. Cover with clear stickles. Then cut the title out in silver for the shadow

  • Apply Flowers & Rhinestones


Page 1:


  • Cut 5 ½” x 6” of My Minds Eye – Coastal “Comfort” Chesterfield Print Paper and round edges.

  • Cut a swoosh out of the My Minds Eye – Coastal “Curious” Curiously Large Spots paper about 5 ½” x 3” adhere this to “Comfort” Paper and ink edges with silver ink.


Swoosh


  • Cut 5” Brown <wshcme-s> from the Storybook Cartridge & ink with blue ink for the journal box.

  • Add title. I used the Don Juan cartridge.

  • Apply Flowers & Rhinestones.


Page 2:


  • Cut 4” x 6” My Minds Eye – Coastal “Lucky” Lucky Run Paper and round edges

  • Add photo with edges rounded

  • Cut a 1” Title using the Don Juan cartridge in white. Lay a piece of ribbon under title. Adhere all to felt page


Page 3:


  • Cut a red 6” Heart <heart4> from the Love Struck Cartridge & spray with pearl glimmer mist. Apply to felt.

  • Cut a 2” white <Love> from the Love Struck Cartridge

  • Add photo

  • Apply Flowers & Rhinestones.


Page 4


  • Cover the wood page with My Minds Eye – Coastal “Celebrate” Party Flowers Paper

  • Add photo matted with Red Cardstock

  • Add 1” title in black. I used the Mickey Font Cartridge for Disney & the Gypsy font welded for land.

  • Apply Flowers & Rhinestones.


Page 5


  • Cut 5 ½” x 6” My Minds Eye – Coastal “Comfort” Cuddle Dots Paper with corners rounded.

  • Cut a red 5” <hearts> from the Love Struck Cartridge

  • Add journaling box

  • Adhere all to album

  • Add Rhinestones


Page 6


  • Double Mat a Photo with white and Coastal “Authentic” Real Imprint Paper and adhere to red felt.

  • Apply Flowers & Rhinestones


Page 7


  • Cut a 5” x 5.5” scalloped square using the Storybook Cartridge & the Coastal “Lucky” Golden Dot Paper. Ink edges with a black marker. Adhere to page.

  • Using the 2 ¾” <heartwng> from the Love Struck Cartridge, cut 2 images. A red and white. Also cut out the shadow <heartwng-s> in blue.

  • Layer the white cutout over the blue shadow. Then with the red, cut out the center heart and cover with red stickles. When dry adhere on top of white layer the apply rhinestones at tips of the wings.

  • Adhere a photo with a white mat with black inked edges. On top of scalloped square. Then add the add the heart wing cutout.

  • Using a scrap of the blue cardstock, add a strip for journaling.


Page 8


  • Cover the wood page with My Minds Eye – Coastal “Celebrate” Table Cloth Paper

  • Cut a 5 ¾” x 4 ½” scalloped square using the Storybook Cartridge in red. Ink edges with a marker. Center photo and adhere to page.

  • Cut a strip of My Minds Eye – Coastal “Lucky” Lucky Run Paper that is 1” x 4 1/4”. Add a 4.5” long strip of black organdy ribbon on top of strip of paper. Add a title using the Don Juan Cartridge welded covered with Stickles “Waterfall” and adhere to ribbon.

  • Add strip of black pearls


Page 9


  • Cut 5 ½”x 6” using the My Minds Eye – Coastal “Lucky” Lucky Run Paper

  • Cut a swoosh out of the My Minds Eye – Coastal “Authentic” Real Imprint paper about 5 ½” x 3” adhere only the left, right and bottom edges to “Lucky” Paper and ink edges with silver ink. This will create a pocket.

  • Weld a title using Gypsy Font & cover in Silver Stickles.

  • Add 2 small journaling boxes that has a library clip on the top of each and place in pocket.

  • Apply Flowers & Rhinestones


Page 10


· Cut a 4”x 6” out of My Minds Eye – “Celebrate” Party Flowers Paper & round edges.


· Add photos with a white mat and round edges.


· Cut a 1” love using the Home Décor Cartridge & cover with silver stickles.


· Apply Flowers & Rhinestones


Page 11


  • Cut a swoosh out of the My Minds Eye – Coastal “Comfort” Cuddle Dots Paper that is about 2 ½” x 6 ½”. Adhere to bottom of page and round corners.

  • Cut a 4” <hrtshdw2> using the Love Struck Cartridge.

  • Cut out title. I used family from Gypsy Wandering. I stretched it 2”x5”.

  • Add photos. Adhere all the page

  • Outline heart using rhinestones.


Page 12


  • Cover the wood page with My Minds Eye – Coastal “Curious” Curiously Large Spots Paper.

  • Add photo with a blue mat with rounded corners & ink with black marker.

  • Use the Coastal “Lucky” Title and ink with black marker.

  • Apply Flowers & Rhinestones


Attach all pages together with Kaiser Craft Album Rings with ribbon attached to each ring.

Thursday, February 25, 2010


Lizzy by Janee Fakhreddine

So this is a gift I made for my In-Law Eric & Tiffany. This was made about my little neice Lizzy. It is hanging beautifully next to her crib. The frame is an amazing magnetic frame from Creative Memories. I have two of these in my house two. They are great. I love this layout! The cool thing about this is that everything is detachable from the frame and there is a base page with photos and embellishments that are a standard 12x12 that they can slip into an album. So when we want to upgrade her layout with her age we can.
Don't call it a come back!!!

Alright so here I am back at my unloved, forgotten blog. Here is my 2010 attempt to make you AWESOME!!!! So here I go. I am planning on posting a new layout of mine every two weeks. And a re-cap of whats going on with me.

So on to the recap...
I decided last year to get out in the scrapbooking world and see if people thought my layouts were as good as I thought they were. Yep I really have grown the past few years in scrapbooking. Found my individual voice. Amazingly this happened when I cancelled all my magazine subscriptions and stopped really looking at other peoples work for inspiration. It is just me. No to say I don't still love to look at amazing artist's work and learn a thing or two.
So I decided to enter on of my layouts into the Creating Keepsakes Pasadena Convention layout contest. I won second place. Check out the posting... It's a badge of honor Creating Keepsakes
So then I decided I wanted to be part of a design team. Not just any team.... But the holy grail of design teams.... Creative Xpress.com.... What What.... And can you believe it. I got accepted as a 2009-2010 Design Team member. That's Insane. They like me they really like me. So how lucky am I? I get to play with the latest cricut cartridges and share my work every month. I am 3 months into it already and I still pinch myself to see if I'm dreaming.... Check out the website to see my goodies and the goodies from the rest of the amazing design team.
Creative Xpress Blog
Hope you like my stuff!

Link Within

Related Posts with Thumbnails
 
Powered by Blogger