Today I got a smashbook and am totally in love!!!!! I have so many little paper keepsakes and memories that never make it to my scrapbook. I can't put it down. Check it out!
http://www.eksuccessbrands.com/kandcompany/smash/
Tuesday, May 31, 2011
Thursday, May 26, 2011
This project is featured on the CreativeXpress.com blog.
Boys will be Boys Frame by Janee Fakhreddine

Products:
• Boys Will be Boys Cartridge
• Qty. 2 - Frame Jen's 12 X 12
• Recess Collection Pack by Basic Grey 12 X 12
• Winter Cardstock Pack by American Crafts 12x12
• Summer Cardstock Pack by American Crafts 12x12
• Neutrals Cardstock Pack by American Crafts 12x12
• Valentine Cardstock Pack by American Crafts 12x12
• Yellow Rhinestone Spiral by Kaiser
• Yellow & Blue Paint (Making Memories Banana & Cornflower)
• Recess Chipboard Shapes or a sheet of chipboard to cut out
• Recess & Academic White Rub-ons By Basic Grey
• Dimensional Dot Circles by American Crafts
• Expression Machine by Cricut

Alien Frame
1. Take one Frame Jen's 12 X 12 and paint it yellow (I used Making Memories Banana)
2. Use a piece of blue cardstock out of the Winter Cardstock Pack by American Crafts 12x12 and cut it down to 11" 1/4 x 11" 1.4 and cut two edges with a serious rounded corner.
3. Do the same as step two but use a black piece of cardstock from the Neutrals Cardstock Pack by American Crafts 12x12 and cut it down to 10" 3/4 x 10" 3/4".
4. Glue each piece of cardstock to the frame and cut out the window each time.
5. Cut the a 7" arrow using in orange cardstock (Summer Cardstock Pack by American Crafts 12x12) for the shadow and Basic Grey - Classmates from the Recess Collection Pack by Basic Grey 12 X 12 and adhere to frame.
6. Cut 1" strips of Orange Cardstock (Summer Cardstock Pack by American Crafts 12x12), Classmates, Answers and Lecture (Recess Collection Pack by Basic Grey 12 X 12 ). Layer them an cut off extra edges.
7. Using the pencil die shape (Recess Collection Pack by Basic Grey 12 X 12 ), glue to cardstock and cut out or Recess Chipboard Shapes. Add on orange cardstock from step 6.
8. Using the Boys Will be Boys Cartridge, cut out 3 1/2" using grey & white (Neutrals Cardstock Pack by American Crafts 12x12), yellow & orange (Summer Cardstock Pack by American Crafts 12x12). I used a black pen to make the black eyes instead of cutting out tiny black dots with my cricut. Assemble and adhere with Dimensional Dot Circles by American Crafts.
9. Using blue cardstock (Winter Cardstock Pack by American Crafts 12x12), Grey & White Cardstock Neutrals Cardstock Pack by American Crafts 12x12, cut out 3 1/2". Adhere with Dimensional Dot Circles by American Crafts.
10. Use Yellow Rhinestone Spiral by Kaiser to make the "fly"
11. Cut a 1 1/2" Block Font title using blue cardstock (Winter Cardstock Pack by American Crafts 12x12) and yellow (Summer Cardstock Pack by American Crafts 12x12). Adhere
12. Using the star die shapes (Recess Collection Pack by Basic Grey 12 X 12 ), glue to cardstock and cut out or Recess Chipboard Shapes and adhere.
13. Add the District no.12 Academic White Rub-ons By Basic Grey.

Pirate Frame
1. Take one Frame Jen's 12 X 12 and paint it blue (I used Making Memories Cornflower)
2. Use a piece of yellow cardstock out of the Summer Cardstock Pack by American Crafts 12x12 and cut it down to 11" 1/4 x 11" 1.4 and cut two edges with a serious rounded corner.
3. Do the same as step two but use a black piece of cardstock from the Neutrals Cardstock Pack by American Crafts 12x12 and cut it down to 10" 3/4 x 10" 3/4".
4. Glue each piece of cardstock to the frame and cut out the window each time.
5. Cut out a wave using answers, 1" strips of Lecture and Teachers Lounge all from Recess Collection Pack by Basic Grey 12 X 12 . Stack like steps and adhere.
6. Using the pen die shape (Recess Collection Pack by Basic Grey 12 X 12 ), glue to cardstock and cut out or Recess Chipboard Shapes. Add on Teachers Lounge paper from step 5.
7. Cut a 4" using white, yellow and Equation (Recess Collection Pack by Basic Grey 12 X 12 ). Assemble and adhere with Dimensional Dot Circles by American Crafts.
8. Add the Notebook holes (Recess White Rub-ons By Basic Grey).
9. Cut a 2" 3/4" using orange & yellow (Summer Cardstock Pack by American Crafts 12x12), black and white (Neutrals Cardstock Pack by American Crafts ). Assemble and adhere with Dimensional Dot Circles by American Crafts.
10. Cut Title Cut a 1 1/2" Block Font title using red (Valentine Cardstock Pack by American Crafts 12x12) and yellow (Summer Cardstock Pack by American Crafts 12x12). Adhere
11. Using the circle die shapes (Recess Collection Pack by Basic Grey 12 X 12 ), glue to cardstock and cut out or Recess Chipboard Shapes and adhere.
12. Add the Paragraph Academic White Rub-ons By Basic Grey .
Boys will be Boys Frame by Janee Fakhreddine

Products:
• Boys Will be Boys Cartridge
• Qty. 2 - Frame Jen's 12 X 12
• Recess Collection Pack by Basic Grey 12 X 12
• Winter Cardstock Pack by American Crafts 12x12
• Summer Cardstock Pack by American Crafts 12x12
• Neutrals Cardstock Pack by American Crafts 12x12
• Valentine Cardstock Pack by American Crafts 12x12
• Yellow Rhinestone Spiral by Kaiser
• Yellow & Blue Paint (Making Memories Banana & Cornflower)
• Recess Chipboard Shapes or a sheet of chipboard to cut out
• Recess & Academic White Rub-ons By Basic Grey
• Dimensional Dot Circles by American Crafts
• Expression Machine by Cricut

Alien Frame
1. Take one Frame Jen's 12 X 12 and paint it yellow (I used Making Memories Banana)
2. Use a piece of blue cardstock out of the Winter Cardstock Pack by American Crafts 12x12 and cut it down to 11" 1/4 x 11" 1.4 and cut two edges with a serious rounded corner.
3. Do the same as step two but use a black piece of cardstock from the Neutrals Cardstock Pack by American Crafts 12x12 and cut it down to 10" 3/4 x 10" 3/4".
4. Glue each piece of cardstock to the frame and cut out the window each time.
5. Cut the a 7" arrow using
6. Cut 1" strips of Orange Cardstock (Summer Cardstock Pack by American Crafts 12x12), Classmates, Answers and Lecture (Recess Collection Pack by Basic Grey 12 X 12 ). Layer them an cut off extra edges.
7. Using the pencil die shape (Recess Collection Pack by Basic Grey 12 X 12 ), glue to cardstock and cut out or Recess Chipboard Shapes. Add on orange cardstock from step 6.
8. Using the Boys Will be Boys Cartridge, cut out 3 1/2"
9. Using blue cardstock (Winter Cardstock Pack by American Crafts 12x12), Grey & White Cardstock Neutrals Cardstock Pack by American Crafts 12x12, cut out 3 1/2"
10. Use Yellow Rhinestone Spiral by Kaiser to make the
11. Cut a 1 1/2" Block Font title using blue cardstock (Winter Cardstock Pack by American Crafts 12x12) and yellow (Summer Cardstock Pack by American Crafts 12x12). Adhere
12. Using the star die shapes (Recess Collection Pack by Basic Grey 12 X 12 ), glue to cardstock and cut out or Recess Chipboard Shapes and adhere.
13. Add the District no.12 Academic White Rub-ons By Basic Grey.

Pirate Frame
1. Take one Frame Jen's 12 X 12 and paint it blue (I used Making Memories Cornflower)
2. Use a piece of yellow cardstock out of the Summer Cardstock Pack by American Crafts 12x12 and cut it down to 11" 1/4 x 11" 1.4 and cut two edges with a serious rounded corner.
3. Do the same as step two but use a black piece of cardstock from the Neutrals Cardstock Pack by American Crafts 12x12 and cut it down to 10" 3/4 x 10" 3/4".
4. Glue each piece of cardstock to the frame and cut out the window each time.
5. Cut out a wave using answers, 1" strips of Lecture and Teachers Lounge all from Recess Collection Pack by Basic Grey 12 X 12 . Stack like steps and adhere.
6. Using the pen die shape (Recess Collection Pack by Basic Grey 12 X 12 ), glue to cardstock and cut out or Recess Chipboard Shapes. Add on Teachers Lounge paper from step 5.
7. Cut a 4"
8. Add the Notebook holes (Recess White Rub-ons By Basic Grey).
9. Cut a 2" 3/4"
10. Cut Title Cut a 1 1/2" Block Font title using red (Valentine Cardstock Pack by American Crafts 12x12) and yellow (Summer Cardstock Pack by American Crafts 12x12). Adhere
11. Using the circle die shapes (Recess Collection Pack by Basic Grey 12 X 12 ), glue to cardstock and cut out or Recess Chipboard Shapes and adhere.
12. Add the Paragraph Academic White Rub-ons By Basic Grey .
Monday, May 23, 2011
Yeah I just won $150 to cricut.com from http://meaningfulmenagerie.blogspot.com/! So exciting. Here is the info.
Monday, May 23, 2011
Cricut.com 150.00 winner is....
Janee!Janee said...I have done both. Thanks for the chance to win.Janee, please email me (my email is cjhassel@yahoo.com) and I will give you the info. on how to redeem your prize! congrats!Hope everyone continues to check out the Cricut blog for more fun and giveaways!Have a great day!, Charity
Posted by Charity Hassel
Hi ProvoCraft and Cricut fans! Great news!ProvoCraft has just launched a new, official Cricut BLOG!!!Already a Cricut Circle member? Then this means you get even more inspiration and chances to win those amazing prizes! (There are already some amazing give-aways on the Cricut blog!)The Official Cricut Blog will introduce artists and crafters to the benefits of the Cricut Circle. It will showcase inspiring projects designed by the Cricut Circle Design Team and provide a central location to receive announcements, promotions and updates on everything Cricut, directly from Provo Craft.The Official Cricut Blog sponsored by the Cricut Circle will feature the following:- Inspirational projects using your favorite Cricut machines. The Imagine, Expression, Cricut Cake, Cuttlebug, Yudu and more.- Hello Thursday Cartridge announcements.- Educational videos and tutorials directly from Provo Craft.- Occasional sneak peeks into the exclusive Cricut Circle Community.- Access to the latest Cricut.com deals.- And much, much more!So what’s a celebration without a prize???The Cricut Circle has so generously offered one of you a chance to win a$150 credit to Cricut.com!Here’s what you have to do to qualify for the scrumptious prize:***To help spread the word about the Official Cricut Blog, grab the ‘blinkie’ below and post it on your webpage, blog, facebook wall, etc. with a link to www.cricutblog.org . Then, be sure to become a follower of both the Official Cricut Blog and my blog!***You have until Sunday, May 22 to do this. I will then select a winner at random from all those who come back here and leave me a comment that you are now following my blog and the Cricut Blog.Happy Crafting!, Charity
Posted by Charity Hassel at 4:52 AM 78 comments
Labels: cricut
Tuesday, May 17, 2011

Here is a layout I did for a contest at a crop at my LSS. I had 2 hours to do a layout. This made me really realize how slow of a scrapper I was. I was rushing like crazy to get this done. I love how it turned out. I won first place and got a fabulous prize. I love the crops at Remember When in Valencia, CA.
Cartridge: Paper Lace
Paper: Stampit up
Friday, May 13, 2011

Tuesday, May 10, 2011

Monday, May 09, 2011

(I got this amazing out for publication image from http://thecozyfarmhouse.wordpress.com)
This is a layout I made of my kids Taekwondo Belt Test and Ceremony they had yesterday. It was so cute. They even broke wooden boards with their axe kicks. I am such a proud mama. Now my kids are at yellow belt.
I also made this for the Cricut Circle Tic Tack Toe Challenge. The 3 elements on the tic tack toe board I used was:
1. Use a cut of a flower shape on your project
2. Use a cuttlebug embossing folder on your project (notice the black dot border along the bottom of the page? I used the polka dot 5x7 embossing folder and inked it lightly with black.
3. Any patterned paper must be printed from the Imagine. (The red printer paper was printed using Audrey.
The Cartridges I used are:
Audrey, Everyday Paper Doll, Gypsy Font & Pagoda
Hope you enjoy!

Yeah! My blog was just awarded The Versatile Blogger Award. Thanks Carolyn's Creative Corner!
Here are 8 things about me:
1. I have twin boys
1. I have twin boys
2. I am married to an amazing man
3. I am so crazy addicted to scrapbooking
4. I am an IT Geek
5. I live in Sunny Southern California
6. I am part of the circut circle and love my cricut
7. I can't belive I am starting to have grey hair
8. I love Las Vegas
Now for the hard part. I have to pick 15 bloggers to give this award to. Anyway, in order to follow the rules, here are the 15 I have chosen (in no particular order):
1. Andrea Amu
2. AnnaMarie Mondro
3. Becki Adams
4. Jen Nichols
5. Karen Pinsonat
6. Laura Mendoza
7. Megan Peacock
8. Nikki Hobbs
9. Stacy Armstrong
10. Stephanie Ackerman
11. Wendy Price
12. http://create-with-joy.com/
13. She's a Sassy Lady
14. http://scrapaholicjen.blogspot.com/
15. http://www.ginaballoons.com/imagination-arts-blog.html
Sunday, May 08, 2011

Saturday, May 07, 2011
Here is the tips and tricks for CreativeXpress to go along with the princess box.
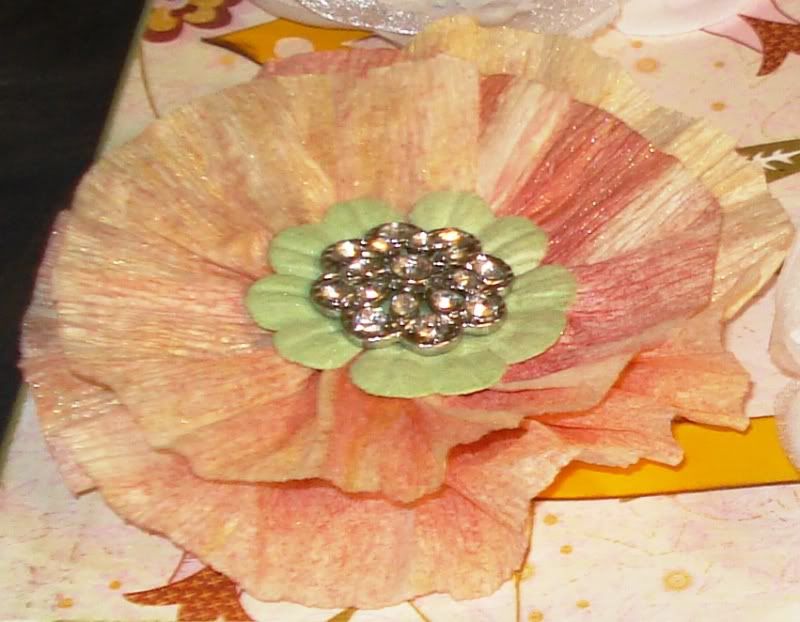
I love the look of this flower and it is a really great way to use glimmer mist sprays to match your layout.
Supplies: Glimmer Mists, Misting Mat by Tattered Angels, super large, White Crate Paper, Removable Double Sided Tape, Cardboard or chipboard, Assorted Flower Layers by Color Me Crazy 16 ct and an embellishment
Making Crate Paper Flowers Using Glimmer Mist

I love the look of this flower and it is a really great way to use glimmer mist sprays to match your layout.
Supplies: Glimmer Mists, Misting Mat by Tattered Angels, super large, White Crate Paper, Removable Double Sided Tape, Cardboard or chipboard, Assorted Flower Layers by Color Me Crazy 16 ct and an embellishment
- Take your white crate paper and cut about a 12". Spray with desired Glimmer Mists. For this I used Peppermint and Gold. I sprayed the entire piece of crate paper with Gold then lightly misted the peppermint so it would blend in. Let dry completely.
- Using your double sided removable tape lay down about 9" on your table or Misting Mat by Tattered Angels, super large. Place the non glimmer mist side on the tape and lightly pleat while adhering.
- Cut a 1" circle out of cardboard or chipboard.
- Remove tape and crate paper from table and start lining the cardboard with the crate paper again lightly pleating.
- For the center of the flower I used a white flower out of the Assorted Flower Layers by Color Me Crazy 16 ct pack and sprayed it with Garden Green Glimmer Mist. Let dry and adhere to center of crate paper flower
- Add jewel embellishment to the center.
Thursday, May 05, 2011
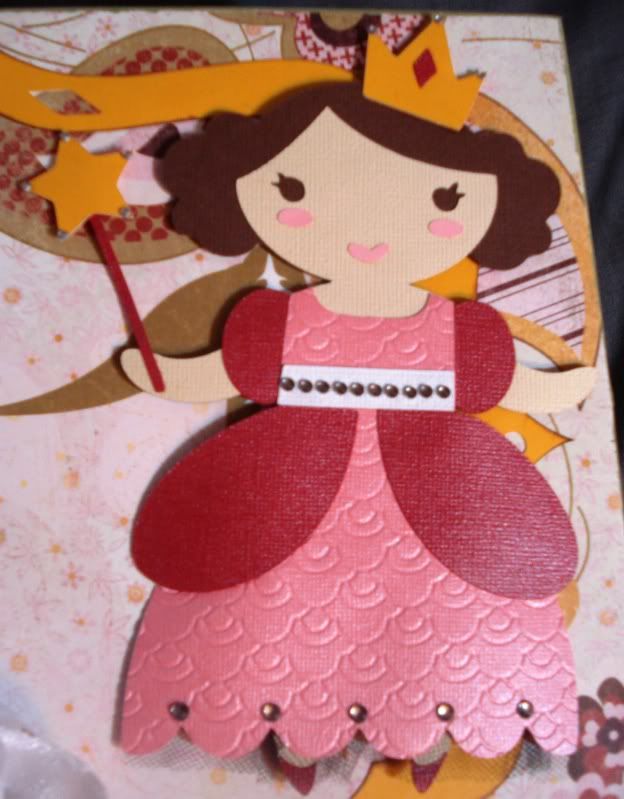
Here is a princess box I made for CreativeXpress
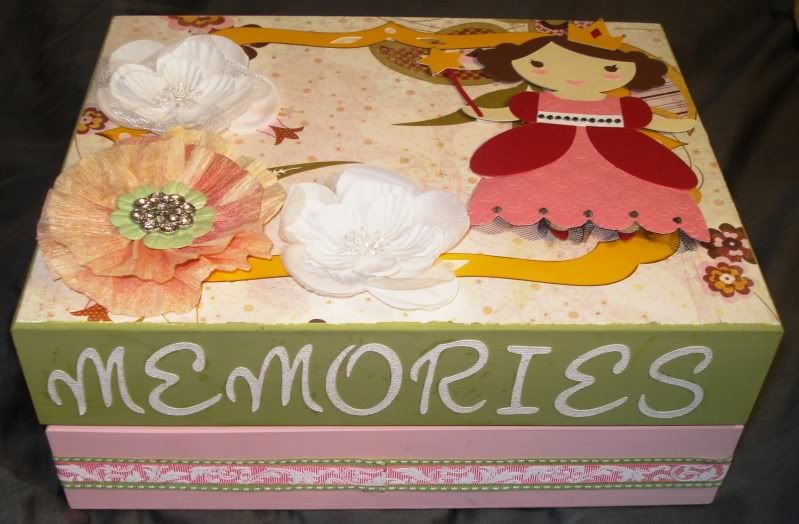
Directions:

Supplies:
- Box Large Jewelry by Provo Craft
- Once Upon a Princess Cartridge by Cricut
- Storybook Font Cartridge by Cricut
- Sugared Collection Pack by Basic Grey
- Flower Layers Value Bag by Color Me Crazy 60 ct
- Rose Petal Paint by Making Memories, 2oz
- Avocado Paint by Making Memories, 2oz
- Rhinestones
- bazzill bling cardstock-Burgandy and pink
- Cardstock -Tan, Brown, Pink, White & Yellow
- Rich Rustics Color Box Cat's Eye Queue by Clearsnap -Brown
- Black Tulle
- Stickles
- Ribbon
- Far East Bundle (Japanese Scales Embossing Folder)
- Blue Designer Machine and Tool Kit by Cuttlebug
- Expression Machine by Cricut
- Design Studio by Cricut or Gypsy by Provo Craft
- Pop Dots
Directions:
- Paint the top of the box Alvacado Paint by Making Memories, 2oz and the bottom with Rose Petal Paint by Making Memories, 2oz. Let completely dry.
- Cover top of box with Basic Grey - Sugared-Dumpling Paper and sand edges.
- For the yellow frame on the box I used the Storybook Font Cartridge by Cricut. <boy-s> It's the BdayBoy Accent frame at 11" x 8". You can use your Design Studio by Cricut or Gypsy by Provo Craft to manipulate the image. Ink edges with Rich Rustics Color Box Cat's Eye Queue by Clearsnap -Brown Chalk

- To make priness I used the Once Upon a Princess Cartridge by Cricut . <Princss1> for the Doll and <Doll1> for the outfit. All cut at 7". I used Brown, Tan, Yellow, Pink, Bling Burgundy and Bling Pink Cardstock. After assembling the doll.
- Assemble the dress separately. Emboss the pink bling dress with the Far East Bundle (Japanese Scales Embossing Folder) and pleat black tulle underneath the dress. I use my adhesive to hold it down. Then attach dress to doll and attach rhinestones. Attach to box with Pop Dots.
- Apply Flowers to box (see tips and tricks on how to make the glimmer mist crate paper flower)
- Cut Memories out using the Once Upon a Princess Cartridge by Cricut . Apply clear Stickles. And adhere to front of box.
- Line bottom with Ribbon.
- Enjoy your Princess Memory Box!


