Sentimental Cards by Janee Fakhreddine
For my project this month I used the new Sentimental Shape & Card Cricut Cartridge. This Cart is amazing. I love all the possibilities with this cart.
Products used:
Expression Machine by Cricut
Sentimentals Shape and Card Cricut Cartridge
Urban Prarie Collection Pack by Basic Grey
Stickles
Black ink
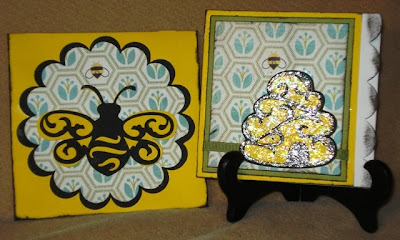
Bee Card with Envelope
- Card:
- Cut a 4 1/2" card <Letter2> using white cardstock. Ink edges in black.
- Cut a 4" x 4 1/2" yellow square, 3 3/4" x 4 1/4" green square & a 3 1/2" x 4" square using basic grey urban prairie, wild flowers paper. Ink all edges with black and adhere to white cardstock
- Add green grosgrain ribbon.
- Cut out a 2 1/2" <hive> in black for the shadow and outline. Also in yellow for the base. Stickle base and outline.
Envelope:
- Cut a 4 1/2" envelope out of yellow cardstock.
- Cut a 6 1/2" black scalloped circle by using tag <desk> then using the same key cut a 6" circle out of the using basic grey urban prairie, wild flowers paper.
- Cut a 3 1/2" <bee> yellow for the shadow and black for the outline. Adhere all the envelope.
Fleur de lis Card with Envelope
Products used:
Sentimentals Shape and Card Cricut Cartridge- Urban Prarie Collection Pack by Basic Grey
- Cuttlebug Machine with Kit
Fleur de lis Diamond A2 Embossing Folder by Cuttlebug
Stickles
Rhinestones
Black ink
Envelope:
- Using blue cardstock cut out envelope using <Pen>. Ink edges in black. (Make sure to keep the Fleur de lis cut out, we will use it on the card)
- Cut a 2" x 2" square using pink cardstock and adhere it to the inside of the envelope behind the Fleur de lis.
- Adhere some stickers from the Urban Prarie Collection Pack and add rhinestones.
Card:
- Cut out 3 cards using <Folder> in pink cardstock, blue cardstock & Basic Grey Urban Prarie Bountiful paper
- Using pink as the card base ink edges in black. Then cut the blue cardstock in half and them cut 1/4" off the top and bottom. Ink edges. Then cut the Basic Grey Urban Prairie Bountiful paper in half then cut 3/8" off the top and bottom. Ink edges and adhere.
- Cut a 2"x3" strip of pink cardstock and emboss using the Fleur de lis Diamond A2 Embossing Folder. Adhere to page and add rhinestones.
- Using the cut out Fleur de lis from the envelope. Stickle and adhere with pop dots.


0 comments:
Post a Comment