Subscribe Twitter Facebook

Tuesday, March 16, 2010

Sentimental Cards by Janee Fakhreddine


For my project this month I used the new Sentimental Shape & Card Cricut Cartridge. This Cart is amazing. I love all the possibilities with this cart.


Products used:


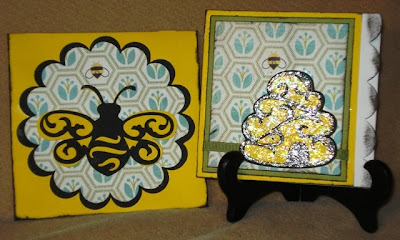
Bee Card with Envelope


  • Card:


  • Cut a 4 1/2" card <Letter2> using white cardstock. Ink edges in black.


  • Cut a 4" x 4 1/2" yellow square, 3 3/4" x 4 1/4" green square & a 3 1/2" x 4" square using basic grey urban prairie, wild flowers paper. Ink all edges with black and adhere to white cardstock


  • Add green grosgrain ribbon.

  • Cut out a 2 1/2" <hive> in black for the shadow and outline. Also in yellow for the base. Stickle base and outline.


Envelope:


  • Cut a 4 1/2" envelope out of yellow cardstock.

  • Cut a 6 1/2" black scalloped circle by using tag <desk> then using the same key cut a 6" circle out of the using basic grey urban prairie, wild flowers paper.


  • Cut a 3 1/2" <bee> yellow for the shadow and black for the outline. Adhere all the envelope.


Fleur de lis Card with Envelope


Products used:


Envelope:


  • Using blue cardstock cut out envelope using <Pen>. Ink edges in black. (Make sure to keep the Fleur de lis cut out, we will use it on the card)


  • Cut a 2" x 2" square using pink cardstock and adhere it to the inside of the envelope behind the Fleur de lis.


  • Adhere some stickers from the Urban Prarie Collection Pack and add rhinestones.


Card:


  • Cut out 3 cards using <Folder> in pink cardstock, blue cardstock & Basic Grey Urban Prarie Bountiful paper


  • Using pink as the card base ink edges in black. Then cut the blue cardstock in half and them cut 1/4" off the top and bottom. Ink edges. Then cut the Basic Grey Urban Prairie Bountiful paper in half then cut 3/8" off the top and bottom. Ink edges and adhere.


  • Cut a 2"x3" strip of pink cardstock and emboss using the Fleur de lis Diamond A2 Embossing Folder. Adhere to page and add rhinestones.


  • Using the cut out Fleur de lis from the envelope. Stickle and adhere with pop dots.
Saturday, March 06, 2010

.Janee's Tips & Tricks

When using a shape cartridge that's secondary feature has a font but the overlay just shows shapes. It is a lot easier to use an overlay from a font cartridge to type out your letters. This short cut will definitely save you time instead of flipping through the book searching for what shape matches what letter
Creative Xpress - Super Dino - By Janee Fakhreddine


For my very first CX assignment I was luck enough to work the Dinosaur Tracks cartridge. I love this cartridge because you can make the dinosaurs as real or imaginative as you want!

For my inspiration I picked my sons' cute dinosaurs they got from Build-A-Bear. They dressed them up as their favorite superheroes. Hence the title "Super Dino"

Here are the supplies that you will need for this layout.

  • Dinosaur Tracks Cartridge by Cricut (SKU # 29-1590)

  • Tiny Mosiac Texture A2 Embossing Folder by Cuttlebug (SKU # 37-1146)

  • Swiss Dotted Embossing Folder by Cuttlebug (SKU # 37-1604)

  • Granola Collection Pack by Basic Grey (SKU # 03-1377)

  • Glazed Granola Brads by Basic Grey (SKU # 03-1383)

  • Pearl Glimmer Mist by Tattered Angels (SKU #03-3708)

  • Cardstock: Green, Cream, Light Brown (Kraft), Dark Grey & Black

  • Dark Grey Embroidery Thread


  1. Grab a 12"x12" piece of cardstock as your base. I always like to use either a sheet of a color I will never use or one that I used with my cricut that has holes in the back but I can still use as my foundation.

  2. Cut the Sunflower, Jute, Crunchy & Trail Mix paper from your Granola Collection pack and cut it diagonal.

  3. Adhere the Sunflower and Jute diagonal 1/2 sheets to your base page. So that it is completely covering the page.

  4. Then start folding your diagonal 1/2 sheet of Crunch and Trail Mix papers in to different shaped triangles. Start playing with the positions of the various triangles on you page. Adhere to your liking. This is what my page looked like when I did it.

  5. Grab your Cream Cardstock and cut Leaf #3 from the Dinosaur Tracks cartridge at 10.45". Adhere half of the leaf to the right side of your layout and cut off extra.

  6. To hand stitch the leaf, I just traced an light outline about 1/8" inside the leaf with a pencil. I took a needle an made my holes. Erased the line and stitch the Dark Grey Embroidery Thread through the holes.

  7. Cut a 4" Spinos Dino, 2" Tricer Dino and a 3" Pteran Dino. Add pearl glimmer mist and embossing.

  8. Cut your title 1 1/4".

  9. For the photo mats I used the pearl glimmer mist on the cream cardstock and used the Tiny Mosiac Texture A2 Embossing Folder on the colored cardstock. The frames have about an 1/8" frame for each color.

  10. Adhere all elements to page. Add the Glazed Granola Brads by Basic Grey and journal inside the leaf.

Tuesday, March 02, 2010


Do someone say Birthday Celebration and Challange????
Check out one of the best yahoo groups!
MegaScraphappy They have the most amazing scrapbook challanges and games around. Plus it is run by my friend Heike which just makes it that much more AWESOME!

So MegaScraphappy is having their Birthday celebration all this month with a bunch of great challanges that get your creative juices flowing. And I am honored to be the subject of her first challange. Here are the details!

Our Traveling begins:

So ... I am all packed, got a good night sleep, car is all filled up and I am
finally ready to go!

My first stop will be at Janee's aka stealthdiva house. It's a very short drive,
but none the less, a fun one :)

She is an awesome scrapper and has 2 most adorable twin boys.

Thanks Janee, for letting me visit your home town (virtually LOL). It was nice
seeing you again at the Mega crop in Anaheim!

But back now to our MSH Birthday Celebration :)

Janee LOVES her Cricut, so I challenge you all to choose from these challenges:

First Choice:
Use items from 3 different cartridges for your layout

or

Second choice:
If you don't have a Cricut, use the colors of the Cricut (green and black) on
your layout.

or

Third choice:
Use 2 of everything in your layout. Do NOT use anything just once or more than
twice! ONLY 2 of everything.

And a little treat for you all, check out Janee's blog
http://stealthdiva.blogspot.com/
and check out the beautiful card Janee created using the Cricut.

Have fun!

Heike

So in response to Heike's challange I whipped up this layout using 3 different cricut cartridges. I used Pagoda, George & Mother's Day 2010. Hope you like!

Monday, March 01, 2010

Photobucket
CHIP ART by Melody Ross
With our new line of Chip Art Kits, Tools, and Stamps you'll be well on your way toward creating your very own personalized books in no time!

Wow look at these new products....
Think of the possibilities!!!


Here is a card I made using the Sentimentals Shape and Card Cricut Cartridge.

Link Within

Related Posts with Thumbnails
 
Powered by Blogger