
Wednesday, December 29, 2010
I hope everyone is continuing to have a very Happy Holidays. The holiday season is always wonderful and crazy with our family. I have some great memories to scrapbook when I get around to it. I will definatly share with you all when completed. I was able to get a little scrapbooking done before the holidays. Here is the layout I did using the SEI Iron-ons. My kids have worn out the shirts already that we may have to do a round 2 of these. Hope you like the layout.

Tuesday, November 16, 2010
Can anyone say ROAD TRIP!!! This is so worth the 5 hour drive round trip!!!!!
Prima Parking Lot SALE!!!
You've all asked for it...now here it is!
Prima's Huge Parking Lot Sale!!!
The sale is open to the public and will take place in Chino, CA! See details on this flyer!
..........................................................................................................................................

Saturday, November 13, 2010


Monday, October 25, 2010


Sunday, October 24, 2010
EXTRA... EXTRA... READ ALL ABOUT IT!!!
Buy and register a Gypsy by Cricut by October 31 and receive 6 free cartridges downloaded to your Gypsy – including the exclusive, all-new “Smiley Cards” cartridge (and don’t forget about Gypsy Wanderings and Gypsy font cartridges that come pre-loaded on the machine). It’s a $419 value!
Free cartridges include:
- Smiley Cards (new and exclusive to this promotion)
- Tags, Bags, Boxes and More (not available in retail)
- Christmas ...(not available in retail)
- Blackletter (not available in retail)
- Printing Press (not available in retail)
- Indie Art (not available in retail)
All current Gypsy owners included! Simply register your Gypsy by October 31, 2010 and get access to all downloads. Register at www.cricut.com/gypsy.
Downloads will be available through a special update to your Gypsy starting November 1st.
New Gypsy cartridge downloads are easy! Just connect your Gypsy to your computer and you’ll automatically be prompted how to start. In just a few steps, you’ll be able to download all six cartridges containing thousands of images! And with Gypsy, you’ll have all the cartridge artwork and keypad overlays on your Gypsy screen, so there’s no actual cartridge, handbook, or packaging.
Creative Xpress is having a great sale on the gypsy. Check it out! http://www.creativexpress.com/categories/%2ASpecial-Offers%252d%252dLimited-Time/Buy-Gypsy-%26-Add-Free-3rd-Cartridge-/
Oh I found a new obsession. SEI Monsterville. This is great. They have Create your own monsters, vampires & witches iron on with your kids. Then you can scrap about it with the coordinating paper. Ahhh. I just ordered it and can't wait to get my hands on it.
Thursday, September 16, 2010
I know I haven't posted anything new in awhile. I have been busy creating my ultimate scrap space (Once its all beautiful and organized, I will defiantly post pictures) and creating for Creative Xpress (which is super secret right now). So I thought I'd share an oldie but goodie. I love this cute simple layout I did of my son eating a mickey ice cream at Disneyland.


Monday, August 16, 2010

Sunday, August 08, 2010
I am so excited about the Cricut Imagine. I am so lucky to be part of a the Creative Xpress/Provo Craft design team. Provo is always coming out with the innovative products that you can't live without. I can't wait to get my hands on this and play away. Check out the video I found on http://www.cricutholiday.com
Thursday, August 05, 2010
A whole album about me???
So I decided that I was going to make a mini chipboard album about myself. Scrapping about myself is very hard for me. Even though I know me better than anyone else, it's hard for me to talk about myself. So I am challenging myself. I have the base design for my mini album and the cover done. I thought I'd share it will all of you. The theme is pieces of me. Please let me know what you think and any ideas on what to fill this with besides the obvious work, family I always do.


So I decided that I was going to make a mini chipboard album about myself. Scrapping about myself is very hard for me. Even though I know me better than anyone else, it's hard for me to talk about myself. So I am challenging myself. I have the base design for my mini album and the cover done. I thought I'd share it will all of you. The theme is pieces of me. Please let me know what you think and any ideas on what to fill this with besides the obvious work, family I always do.


Sunday, August 01, 2010
Wednesday, July 28, 2010

Monday, July 26, 2010


Sunday, July 11, 2010
The new goodie that I love!!
I just got the i-rock yesterday and I got to play with it. I really like it because the gems seem super permanent. This is great for projects that aren't going to be protected by a plastic cover like a chipboard album. As you know I love bling. So you know I had to add this to my stash.
I just got the i-rock yesterday and I got to play with it. I really like it because the gems seem super permanent. This is great for projects that aren't going to be protected by a plastic cover like a chipboard album. As you know I love bling. So you know I had to add this to my stash.
Tuesday, July 06, 2010
So my scrap closet has now become a mess again. Thinking I really need to get some clipups and get my closet organized again.

Clip it Up Jumbo
Each 18.5" Clip it Up Jumbo comes complete with -15.5" High Center column -12" Diameter Base -15" Diameter Metal Ring on Rotating Arm -80 Chromed Metal Swivel Clips -25 Section Tabs with Do-It-Yourself Labels -Handle Perfect for 12"x12" paper, kits and larger items.

Plus they are having all these sales this month!
•July 4-10 ~ 40% off the Clip it Up Jumbo
•July 11-17 ~ 40% off the Clip it Up Mini
•July 18-24 ~ 40% off the Clip it Up Swinging Wall Arm, Under the Shelf Rod, and Wall Mount
•July 25-31~ 40% off the Clip it Up Main Base & Upper Tier
*Retail customers only and not valid with any other offers.
Hmmm... The possabilites are endless.
Thursday, June 24, 2010

Can I just say that this cartridge is AWESOME!!!!! Not only can you make amazing 3D Superman party items, you can honor that amazing SUPERMAN/SUPERGIRL in your life. Everyone is SUPER in their own way. This is why this is now my favorite cartridge!!! Of course my Superman in my life is my amazing husband. He was so honored when I made this layout.
Product:
- Superman Activity Cartridge by Cricut
- Boxer Collection Pack by Basic Grey
- Bazzill Cardstock
- Rhinestones
- Chocolate & Blueberries Fluid Chalk Queue by Clearsnap
- Gypsy by Provo Craft
- White Foam Adhesive Squares by Therm O Web, 88 count
1. Grab the Basic Grey - Boxer - Long Underwear paper. Us this as your base page.
2. Cut white cardstock using the
3. Cut the Basic Grey - Boxer - Buckle paper using the
4. Using black, white and yellow cardstock cut 6"

5. Triple mat a 4" x 6" with a 1/8" border on each color in white, yellow and black. And adhere on top of star tails.
6. Cut "You are my" 1 1/2" with a yellow shadow and blue font base. Adhere to layout.
7. Cut a 3"

8. Cut a 5"

Tips and Tricks by Janee Fakhreddine
I love, love, love…. did I say love BLING!!!
Anything that sparkles I am a devoted fan. This is one of the reasons why Stickles and Glimmer Mist make me so giddy and is a must have in my collection. But along with this is my blow dryer. Yes a little cheap hair blow dryer. Stickles and Glimmer Mist can take a long time to dry. But what I do is set my blow dryer on cool. I hold my Stickled artwork down with a pen (not retracted of course) and dry away. This cuts the drying time drastically down. I do not use a heat gun because the heat is too hot and can burn or warp my paper.
Monday, June 21, 2010

This is a layout using the mini monsters cricut cartridge I just got yesterday. I love new carts! =) Alot of people have been asking me what the paper company is I used. It's called Glitz and the collection is Distressed Couture
Saturday, June 19, 2010

Wednesday, June 16, 2010

Wednesday, June 09, 2010

Tuesday, June 08, 2010
Sunday, June 06, 2010

I am on Scrap Tiffany's blog. I made a layout about my Grandma's House
I took her amazing class. Here is the blog about here class with me wearing a ScrapTiffany apron.
I took her amazing class. Here is the blog about here class with me wearing a ScrapTiffany apron.
Saturday, May 15, 2010

Wow life has been crazy. Lots of work and lots of traveling. I took some great photos now just need to sit and scrap them. Where will I find the time? I can't believe I have not posted anything in almost 2 months. Bad Janee (as I slap my hand). Here is a frame I made using the Once Upon a Princess Cricut Cartridge. The extremely cute little girl in the photo is my niece. Hope you like the frame.
Tuesday, March 16, 2010
Sentimental Cards by Janee Fakhreddine
For my project this month I used the new Sentimental Shape & Card Cricut Cartridge. This Cart is amazing. I love all the possibilities with this cart.
Products used:
Expression Machine by Cricut
Sentimentals Shape and Card Cricut Cartridge
Urban Prarie Collection Pack by Basic Grey
Stickles
Black ink

Bee Card with Envelope
- Card:
- Cut a 4 1/2" card <Letter2> using white cardstock. Ink edges in black.
- Cut a 4" x 4 1/2" yellow square, 3 3/4" x 4 1/4" green square & a 3 1/2" x 4" square using basic grey urban prairie, wild flowers paper. Ink all edges with black and adhere to white cardstock
- Add green grosgrain ribbon.
- Cut out a 2 1/2" <hive> in black for the shadow and outline. Also in yellow for the base. Stickle base and outline.
Envelope:
- Cut a 4 1/2" envelope out of yellow cardstock.
- Cut a 6 1/2" black scalloped circle by using tag <desk> then using the same key cut a 6" circle out of the using basic grey urban prairie, wild flowers paper.
- Cut a 3 1/2" <bee> yellow for the shadow and black for the outline. Adhere all the envelope.

Fleur de lis Card with Envelope
Products used:
Sentimentals Shape and Card Cricut Cartridge- Urban Prarie Collection Pack by Basic Grey
- Cuttlebug Machine with Kit
Fleur de lis Diamond A2 Embossing Folder by Cuttlebug
Stickles
Rhinestones
Black ink
Envelope:
- Using blue cardstock cut out envelope using <Pen>. Ink edges in black. (Make sure to keep the Fleur de lis cut out, we will use it on the card)
- Cut a 2" x 2" square using pink cardstock and adhere it to the inside of the envelope behind the Fleur de lis.
- Adhere some stickers from the Urban Prarie Collection Pack and add rhinestones.
Card:
- Cut out 3 cards using <Folder> in pink cardstock, blue cardstock & Basic Grey Urban Prarie Bountiful paper
- Using pink as the card base ink edges in black. Then cut the blue cardstock in half and them cut 1/4" off the top and bottom. Ink edges. Then cut the Basic Grey Urban Prairie Bountiful paper in half then cut 3/8" off the top and bottom. Ink edges and adhere.
- Cut a 2"x3" strip of pink cardstock and emboss using the Fleur de lis Diamond A2 Embossing Folder. Adhere to page and add rhinestones.
- Using the cut out Fleur de lis from the envelope. Stickle and adhere with pop dots.
Saturday, March 06, 2010
.Janee's Tips & Tricks
When using a shape cartridge that's secondary feature has a font but the overlay just shows shapes. It is a lot easier to use an overlay from a font cartridge to type out your letters. This short cut will definitely save you time instead of flipping through the book searching for what shape matches what letter
When using a shape cartridge that's secondary feature has a font but the overlay just shows shapes. It is a lot easier to use an overlay from a font cartridge to type out your letters. This short cut will definitely save you time instead of flipping through the book searching for what shape matches what letter
Creative Xpress - Super Dino - By Janee Fakhreddine

For my very first CX assignment I was luck enough to work the Dinosaur Tracks cartridge. I love this cartridge because you can make the dinosaurs as real or imaginative as you want!
For my inspiration I picked my sons' cute dinosaurs they got from Build-A-Bear. They dressed them up as their favorite superheroes. Hence the title "Super Dino"
Here are the supplies that you will need for this layout.
- Dinosaur Tracks Cartridge by Cricut (SKU # 29-1590)
- Tiny Mosiac Texture A2 Embossing Folder by Cuttlebug (SKU # 37-1146)
- Swiss Dotted Embossing Folder by Cuttlebug (SKU # 37-1604)
- Granola Collection Pack by Basic Grey (SKU # 03-1377)
- Glazed Granola Brads by Basic Grey (SKU # 03-1383)
- Pearl Glimmer Mist by Tattered Angels (SKU #03-3708)
- Cardstock: Green, Cream, Light Brown (Kraft), Dark Grey & Black
- Dark Grey Embroidery Thread
- Grab a 12"x12" piece of cardstock as your base. I always like to use either a sheet of a color I will never use or one that I used with my cricut that has holes in the back but I can still use as my foundation.
- Cut the Sunflower, Jute, Crunchy & Trail Mix paper from your Granola Collection pack and cut it diagonal.
- Adhere the Sunflower and Jute diagonal 1/2 sheets to your base page. So that it is completely covering the page.
- Then start folding your diagonal 1/2 sheet of Crunch and Trail Mix papers in to different shaped triangles. Start playing with the positions of the various triangles on you page. Adhere to your liking. This is what my page looked like when I did it.

- Grab your Cream Cardstock and cut Leaf #3 from the Dinosaur Tracks cartridge at 10.45". Adhere half of the leaf to the right side of your layout and cut off extra.
- To hand stitch the leaf, I just traced an light outline about 1/8" inside the leaf with a pencil. I took a needle an made my holes. Erased the line and stitch the Dark Grey Embroidery Thread through the holes.
- Cut a 4" Spinos Dino, 2" Tricer Dino and a 3" Pteran Dino. Add pearl glimmer mist and embossing.
- Cut your title 1 1/4".
- For the photo mats I used the pearl glimmer mist on the cream cardstock and used the Tiny Mosiac Texture A2 Embossing Folder on the colored cardstock. The frames have about an 1/8" frame for each color.
- Adhere all elements to page. Add the Glazed Granola Brads by Basic Grey and journal inside the leaf.

Tuesday, March 02, 2010

Do someone say Birthday Celebration and Challange????
Check out one of the best yahoo groups!
MegaScraphappy They have the most amazing scrapbook challanges and games around. Plus it is run by my friend Heike which just makes it that much more AWESOME!
So MegaScraphappy is having their Birthday celebration all this month with a bunch of great challanges that get your creative juices flowing. And I am honored to be the subject of her first challange. Here are the details!
Our Traveling begins:
So ... I am all packed, got a good night sleep, car is all filled up and I am
finally ready to go!
My first stop will be at Janee's aka stealthdiva house. It's a very short drive,
but none the less, a fun one :)
She is an awesome scrapper and has 2 most adorable twin boys.
Thanks Janee, for letting me visit your home town (virtually LOL). It was nice
seeing you again at the Mega crop in Anaheim!
But back now to our MSH Birthday Celebration :)
Janee LOVES her Cricut, so I challenge you all to choose from these challenges:
First Choice:
Use items from 3 different cartridges for your layout
or
Second choice:
If you don't have a Cricut, use the colors of the Cricut (green and black) on
your layout.
or
Third choice:
Use 2 of everything in your layout. Do NOT use anything just once or more than
twice! ONLY 2 of everything.
And a little treat for you all, check out Janee's blog
http://stealthdiva.blogspot.com/
and check out the beautiful card Janee created using the Cricut.
Have fun!
Heike
So in response to Heike's challange I whipped up this layout using 3 different cricut cartridges. I used Pagoda, George & Mother's Day 2010. Hope you like!
Monday, March 01, 2010

CHIP ART by Melody Ross
With our new line of Chip Art Kits, Tools, and Stamps you'll be well on your way toward creating your very own personalized books in no time!
Wow look at these new products....
Think of the possibilities!!!

Sunday, February 28, 2010

Prima has something really big coming your way….
I love scrapbook suprises and goodies. And who doesn't just drool over prima flowers??? You can never have enough! I can't wait to see whats in store. There new stuff is amazing. I can't wait to use the Prima Cherry Blossoms I just bought with my Pagoda Cartridge and Asian Bundle Embossing Folders. I will post once I create it.
The best way to carry all your cricut cartridges
Before I owned my gypsy i used to carry all of my cartridges to every crop I went to. I am not much of a planner so I take everything with me. Below is the best way i found to carry all my cricut items. I also altered it with vinyl, ribbon, flowers and rhinestones. I bought this at Target. I did put all my cartridges in a zip lock bag with a list of what I owned. But I had all the books, layovers and even my jukebox in there.
Snapware 2-Layer Craft Organizer - Clear


Here is my nested images using the cricut tip featured on creativexpress.com
By Janee Fakhreddine
I love nested images. And I found a great way to do it using my cricut.
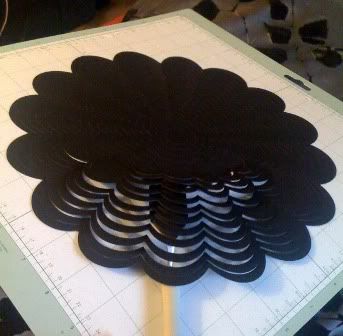 First you need to choose an image that is proportionate on each side. Load a 12x12 piece of paper. Press the center point button and line the cricut blade with the center of your paper. Select your image and cut the larges one you can first. Once that is done decrease your size by .5 and cut image again. Keep repeating step in .5 increments. Once you are done you will have a bunch of different sized images. This is also a great way to save paper if you know you want alot of that image on the same page.
By Janee Fakhreddine
I love nested images. And I found a great way to do it using my cricut.
First you need to choose an image that is proportionate on each side. Load a 12x12 piece of paper. Press the center point button and line the cricut blade with the center of your paper. Select your image and cut the larges one you can first. Once that is done decrease your size by .5 and cut image again. Keep repeating step in .5 increments. Once you are done you will have a bunch of different sized images. This is also a great way to save paper if you know you want alot of that image on the same page.
Saturday, February 27, 2010
Here are just a few products and companies I can't live without!
 Cuttlebug
I am in love with the embossing folders!

Gypsy
I love this machine. i am always learning on it and it really comes in handy when I travel for work and I'm bored in a hotel room.

Cricut Expression
I use this is almost everything I do. It really takes your crafts to the next level and so worth every penny!

GlueGlider Pro
I have carpal tunnel and this is the only adhesive that lets me crop 14 hours straight without it flaring up.

Scotch® Scrapbookers Glue with 2-way Applicator I use this for all my cricut needs!
Paper I Love!
 Kaiser my fave international company.
 GCD Studios-Amazing Stuff!

Bazzill Cardstock
You could never have to much cardstock!

Basic Grey i love what you can create with their paper.
 American Craft I love the AC Cardstock and Thickers
CuttlebugI am in love with the embossing folders!

Gypsy
I love this machine. i am always learning on it and it really comes in handy when I travel for work and I'm bored in a hotel room.
Cricut Expression
I use this is almost everything I do. It really takes your crafts to the next level and so worth every penny!

GlueGlider Pro
I have carpal tunnel and this is the only adhesive that lets me crop 14 hours straight without it flaring up.

Scotch® Scrapbookers Glue with 2-way Applicator I use this for all my cricut needs!
Paper I Love!
Kaiser my fave international company. GCD Studios-Amazing Stuff!Bazzill Cardstock
You could never have to much cardstock!
Basic Grey i love what you can create with their paper.
 American Craft I love the AC Cardstock and Thickers


